Thursday, 30 May 2013

Chorizo and Chickpea Stew

So. This is awkward. It's been a shockingly long time since my last post! Apologies, apologies. However, I have a very good reason for this: I got a job! Well, sort of. It's a temporary position teaching a new summer school course at my university. Two weeks long, this course is designed to teach students who have just finished their first year a range of different skills that they might not have come across in their degree classes since they come from such a wide variety of subjects. For example, we have representatives from physics to english to history or art which makes for a really fantastic class mix. I'm really enjoying my time as a teaching assistant although it means that a lot of my other pursuits (like this blog!) have fallen a bit by the way side. The working world is tough! Although the class is short in duration, it is pretty full on in terms of contact hours with lectures and seminars from 10 am to 5 pm or even later some days. As TAs we need to be there for almost everything so it's been an exhausting week.

Chorizo and chickpea stew ready for the fridge
While I haven't been cooking too much this week, I have been focusing on my lunches since the short lunch breaks we have with the course mean that bringing my lunch with me in the morning makes a lot of sense (and saves money!). To this end, I made up a huge batch of this chorizo and chickpea stew at the weekend and basically have just been enjoying it with lots of extra veggies and tasty goodness piled on top every day for either lunch or dinner... and occasionally both! Inspired by an episode of Nigella Express, this recipe is perfect and super easy with only three main  ingredients. I added a dash of Greek yogurt and a sprinkle of fresh coriander the first time and ever since I've been basically just adding other leftovers to my bowl... all successfully since this dish is happy to share the spotlight. I added a few bits and pieces to Nigella's original recipe so I'll include those to the list below. The following pictures are of my most recent masterpiece with some beetroot salad, yellow bell pepper, feta and green onions. Finally, this recipe makes a massive amount but can easily be halved...

Couscous with a ladle of stew
Adding in the beetroot salad 
Bell pepper, feta and green onion on top 
Finished product ready to eat! 
Recipe inspired by www.foodnetwork.co.uk 
Prep Time: 1 min
Cook Time: 30 min
Serves:  6-8 

Ingredients: 

Splash of olive oil
1 onion, chopped
320 g Chorizo, sliced into half circles 
2 cans of chickpeas, drained
2 cans of cherry tomatoes with their juice 
1/2 tsp mixed herbs
1/2 tsp crushed red pepper flakes 
1/2 tsp paprika 
1/2 tsp cayenne pepper 
30g Greek yogurt per bowl
30g couscous per bowl
Sprinkling of fresh coriander, chopped 

Method: 

In a large pot, heat the splash of oil over medium heat and add the onion. When it's beginning to become translucent, add the chorizo and allow to saute for a few minutes. Next, add the chickpeas and the tomatoes with half a can of water. Stir in the herbs and spices and leave to simmer for half an hour. While waiting, pour the couscous into a bowl and cover with boiling water (adding a half centimeter of water above the top of the couscous) and place a plate on top to keep in the steam. Set aside for fifteen minutes. When ready top the couscous with the stew and add a dollop of Greek yogurt and a tablespoon or so of fresh coriander. Enjoy! 

Tuesday, 21 May 2013

Vegetarian Japchae

Hello! I'm pleased to offer up on of my favorite Korean dishes for today's post: Japchae! While I usually have this with beef when I eat out, at home I rarely buy meat if I'm cooking for myself so this is a vegetarian version. This was so easy to put together that I really can't believe I've never tried it before. The only unusual ingredients are the noodles. Glass noodles are made from sweet potato so aren't your average pasta option. The texture is more chewy and slippery than regular noodles which might not sound delicious but trust me, it is. One tip I would suggest is to cut your noodles if they come folded over like mine as this makes them easier to eat. I snipped the folded end and left them otherwise intact.

Ingredients
Making friends in the pan

I had picked up these noodles the last time I was in the Korean shop and they've been sitting around in my cupboard ever since. So, I thought I'd give this recipe a go even though I didn't have shitake mushrooms, which are traditionally included. Normally you buy the dry mushrooms, soak them for 2 hours or so, wring out the water and slice. I substituted chestnut mushrooms since that's what I had in my fridge already and it was perfectly tasty. Other optional additions could be some spinach (boiled for a minute and rinsed) and bell pepper (thinly sliced). If you'd like to add in the beef, thinly slice a steak and saute with the onions. In the traditional recipes I've been reading, they often cook the ingredients individually and mix just before serving. I was impatient and therefore added all the ingredients into one pan and it still turned out ok... so it's up to you!

Noodles ready for cooking
Noodles after boiling
Finished product! 

Prep Time: 10 min
Cook Time: 10 min
Serves: 2

Ingredients: 

1 tbsp olive oil
1 tbsp sesame oil 
4 chestnut mushrooms, sliced 
1/2 a large carrot, thinly sliced
1/2 a yellow onion, thinly sliced
3 green onions
Handful of glass noodles
3 tablespoons soy sauce
1 tablespoon sugar
Sesame seeds 

Method: 

Splash the oils into a large saute pan and heat over medium high. Add the onions into the pan and saute until they start to soften. Next add the mushrooms and carrot, stirring regularly to allow them to cook evenly. When the mushrooms have started to soften, add the green onions and remove from the heat. Drizzle one tablespoon of soy sauce over the vegetables and set aside. Boil water in a medium pot and add the glass noodles. Allow to boil for 4-5 minutes, stirring to make sure all the noodles are submerged. The noodles are ready when they are soft and chewy. When finished, drain the noodles and add to the pan with the vegetables. Place the saute pan over a medium heat, add the remaining soy sauce and sugar and stir to incorporate. When the pan is sizzling again, it's ready! Serve in bowls and sprinkle sesame seeds over the top. Enjoy! 

Friday, 17 May 2013

Easy Kimchi

As my friend Sora can attest, I love me some kimchi. Every time we pop into a Korean restaurant, we have to have this as a mandatory side dish. I just think it's the most delicious thing out there. Anyway, I'd never really thought about making it at home (despite watching lots of videos online about different recipes etc) until I was faced with a massive surplus of cabbage after last month's food challenge. So, it seemed to be a pretty good time to give it a whirl. 

Kimchi! 

This recipe comes from Maangchi, like most of my Korean food attempts. It should be noted that this is "Emergency Kimchi" because she often makes this version when she's away from home and unable to get the more traditional Napa cabbage. Using regular white cabbage means the consistency is a bit different but this recipe is also a lot simpler than more traditional ones and therefore I think it's a pretty fair trade off. 

Recipe via www.maangchi.com 

Prep Time: 20 min
Cook Time: N/A

Ingredients: 

2 pounds white cabbage, thinly sliced
1 cup water
1/4 cup salt 
1 bunch, green onions, sliced 
1 carrot, chopped into match sticks
1 tbsp sugar
1/3 cup hot pepper flakes
1/4 cup fish sauce
1/4 cup minced garlic

Method: 

Mix the cabbage, water and salt and set aside for 10 minutes to let cabbage wilt a bit. Rinse thoroughly with water and set aside. In another bowl, mix the remaining ingredients until well combined before slowly adding the cabbage. Make sure all the cabbage is coated in the paste and move to an airtight container. Enjoy! 


Wednesday, 8 May 2013

Food Challenge April: Okonomiyaki Pancake

At the beginning of April, I joined a very unusual enterprise: a year round food challenge. A product of the imaginations of my lovely friends Laura and Kate (and Rachel who I haven't met but am sure is also lovely), the challenge requires all members to submit three ingredients each month which are then placed into a hat. Laura draws out three at random and those ingredients then form the basis of a dish that we all have to individually come up with before submitting our results at the end of each month. While it isn't a competition, the goal is to push ourselves to try out new and unusual recipes. The only rule is that you have to come up with the final dish on your own, although you can look at other recipes for inspiration. I've never tried anything like this before so I was really excited to jump on board and get cooking! I'll be posting my resulting recipes here as well every month. So, without further ado, April's ingredients were: beetroot, cabbage and chorizo.

Food challenge ingredients

Chopped cabbage

Now, I'm sure like most of you, my mind immediately went to cabbage rolls. But with the weather getting warmer, I just wasn't in the mood for something that was quite heavy when I'd tried it previously. Another thought I had was of course coleslaw (especially since I immediately remembered my cousin Wendy's delicious version!) but I thought that might be a bit greedy as a main dish. So, I put the food challenge to the side until I happened to be reading an article about Japanese restaurants and they mentioned Okonomiyaki. I'd never heard of this Japanese pancake dish before but since on of the main ingredients is cabbage, I thought it deserved more of an investigation. Much to my surprise, the name essentially means "whatever you want" and you can customize your pancake with whatever ingredients you fancy. Perfect for my first food challenge!

Chopped chorizo


Grated cabbage

I grated the beetroot so that it would color the pancake and that way we wouldn't have massive lumps of beetroot strewn throughout the dish. I liked the effect but I can understand how others might be a bit put off by a Pepto colored pancake! Another option would be to pickle the beetroot so that it is closer to the original Okonomiyaki dish, which is served with different sauces and pickles. While I'm calling this an Okonomiyaki pancake, I am also fully aware that it's not a very true representation. For example, Okonomiyaki is usually served as one big pancake but my pans weren't going to accommodate a behemoth like that so I split the batter into four smaller versions. However, I really liked the idea of having a dish that would make using leftovers really easy and I think I'll try this again in the future. The only change I would make is to add some green onion for color to the final dish... I didn't have any this time unfortunately. Another dish that I'm looking forward to trying is Kimchijeon (kimchi pancake) with some homemade kimchi I made using the leftovers from this dish... so stay tuned!

Basic batter ready for ingredients!

Pancake ready to flip

Finished version... needs something green!

Prep Time: 10 min
Cook Time: 10 min
Serves: 2-4

Ingredients: 

1 cup flour
2/3 cup water
1 egg
1/4 of a small white cabbage, chopped into thin strips
100g beetroot, grated
100g chorizo, chopped into small pieces
Oil

Method: 

Mix all of the ingredients except the oil in a large bowl. Heat a large pan over medium heat and add a splash of oil to keep the pancake from sticking. When the pan is hot, carefully pour in your desired amount of the batter and lightly press with a spatula to help it spread out. You should have about a pancake about a centimeter thick (possibly a bit more depending on your ingredients). Allow to cook until the bottom is nicely browned and a bit crispy. I also followed the age old pancake advice and waited until I saw bubbles on the top before flipping. When it's ready, carefully flip the pancake and allow the second side to brown as well. Serve with your choice of dipping sauce, enjoy! 

Monday, 6 May 2013

Travel Caper: Rome Restaurants

Buon giorno! This is a bit of a different caper as it's not a recipe, but rather a quick guide to my favorite places to eat in Rome. I've been popping back and forth between Rome and London for a few years now as my parents have been living there. However, with their move to Naples looming on the horizon, I thought now would be a good time to tally up all the lovely meals we've had into this list. It's by no means an exhaustive list but I hope it will be useful to any Rome visitors who'd like to have a tasty and authentic meal without breaking the bank (which is very easy to do in Rome... so many overpriced and underwhelming restaurants!). I'm also including a few non-restaurant additions which are my favorite food purchases within the supermarket. Let's get started!

Rome Food Shopping Favorites: 

Apertif anyone?

When I'm in Rome, we have a lovely supermarket just down the street from our house... which gives me ample opportunity to pick up two of my favorite things: gorgonzola and prosecco! I prefer prosecco to champagne because it's slightly sweeter and, often, cheaper. It's one of those things I only really have in Rome since it would be pricier back in London and feel a bit over indulgent in our little London flat! The gorgonzola is "gorgonzola dolci" the older, sweeter version they sell. There is also a 'gorgonzola piccante" but that's a bit too sharp for my liking. If you're in Italy, or even just in a great supermarket where you live, try out the dolci version. Even if you're not a fan of blue cheese, I think you'd be hard pressed not to like this one! 

Izzy approves of prosecco! 

The Local: La Balestra (2, Via Simeto, Rome, 00198)

Inside La Balestra
This little restaurant is our local favorite in our area of Rome. My parents stumbled upon it and have been returning customers ever since. The place is family owned and judging by the fact that it's packed every night, obviously a neighborhood favorite. The menu is extensive with great pasta and meat options. I also had the pannacotta (my favorite dessert) and it was delicious. I highly recommend a stop here if you're in the Villa Borghese.

Steak with green peppercorn sauce

Asparagus with lemon and olive oil

Roman artichoke

Steak with balsamic vinegar glaze 

Pannacotta with blueberry sauce

The Cafe: Bar Ristorante Tre Scalini (Piazza Navonna)

Aperol Spritz! 

This was just a quick stop with Laure and Anna for a coffee in the lovely Piazza Navonna. What made it special was that Anna and I tried out the delicious Aperol Spritz - a combination of Aperol and prosecco. I'd never had it before and was pleasantly surprised. It's the perfect drink to enjoy on a hot afternoon. While Tre Scalini is hardly unique among the tons of restaurants and cafes in the piazza, it gets my vote because the managers were the only ones clever enough to take down a few umbrellas to create an area of outdoor seating in the sun (which was exactly what we were looking for).


The Pizzeria: Dar Poeta (33 Vicolo del Bologna, Rome, 00153)

Laure's mushroom pizza 

This restaurant is my hands down favorite pizza place in all of Rome. The prices are phenomenally reasonable (7-8 euro a pizza compared to closer to 20 elsewhere), the toppings are very original (buffalo mozzarella and courgette cream for example) and the staff are friendly. The restaurant is deceptively large with outdoor seating and two floors of tables inside. My absolute favorite pizza is the Lingua de Foco, a spicy option with tons of flavor. If you're in the Trastevere neighborhood and need a break from seeing the beautiful Santa Maria church, then this is a great place to have a quick snack.

Anna's buffalo mozzarella and artichoke pizza

The Gelateria: Pompi Srl (82, Via della Croce, Rome)

This gem in the heart of the touristy district in Rome was a complete surprise to me. Recommended by a colleague of Laure's in London, we decided to search it out since it's so close to several of the sites we wanted to take Anna to (Spanish Steps, Piazza Popolo, etc). The shop is also close to the Via del Corso, one of the main shopping streets in Rome so it makes for a nice stop off after running errands. The prices were really surprising with our fairly large ice cream cones coming in at only 3 euros each. The only downside is that there isn't any attached seating so you'll have to wander with your treat. However, we found a nice side street with some places to sit nearby. Highly recommend this gelateria for it's wide range of flavors and generous portions. I went for a lemon, strawberry and peach combo, Laure chose chocolate and vanilla, while Anna decided nutella and chocolate sounded best. We were three very happy customers!

Gelato power! 

The Overall Option: San Marco (38, Via Sardegna, Rome, 00187)

Spicy bread they bring before the starters
San Marco gets my vote for overall winning option because I've never had a disappointing meal here, despite trying several different dishes on the menu. This is close to the Embassy so it's often where I'll meet my Dad for lunch. They have pizza, pasta and meat options so it's a great place if you aren't sure what you're craving. This last visit had an extra bonus: Mom joined us! She had the best dish that day: lemon pasta. If it's still on the menu next time you're in Rome, I can't stress how much you need to order it. The pannacotta wasn't as nice as they've had in the past so next time I think tiramisu will be on the cards...

Wine and bread 

Pannacotta with strawberry sauce

Phew! Sorry for such a long post but I wanted to give the best picture of Rome dining as possible. I hope this helps for any future trips to Rome. While I'm sad that my parents will be moving in July, I'm looking forward to future food adventures in Naples! 

Saturday, 4 May 2013

Vegetarian Samosas

Hello lovely readers! Apologies once again for the long delay in posting - things have been a bit busy on the PhD front, which now also includes a soul crushing search for a part time job that has so far been unsuccessful. Sigh! However, I did have a great time at the recent launch of our Science, Medicine and Society network (the organization for which I've been working with a few other postgrads to gather ethnographic fieldwork at community groups around London). We had a great launch and we were able to present our findings so far in a special session. All in all, it was a great event and I even had my first experience live tweeting something (@caitiescapers). I'll be using twitter to announce new recipes in the works and when posts will be going up so make sure to follow me (still learning the lingo...). Now that I'm finally back to my more normal routine, I thought it was time for a new recipe!

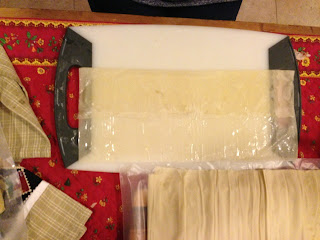
Step one: lay out one sheet of filo dough
Step two: brush with melted butter 
Step three: fold by thirds until you have a three layer strip
I've been wanting to try out samosas for a while since they're probably my favorite Indian dish but I wasn't sure if I wanted to take on what seemed to be a pretty involved process. However, after having a look online at different options, I decided to try it out with filo dough as a first attempt because it was the most readily available in my local supermarket in Rome. I thought this led to a pretty tasty result and I'll definitely be making these again. I'd like to experiment with making them smaller to suit party food so that might be a future post on this blog! (You know how much I love party nibbles!). Huge thank you to Laure for the photos of the rolling method and to Anna for being patient enough to stay and chat to us throughout the process! Finally, next time I make them, I'll include the coriander sauce that's a traditional accompaniment and I'll be sure to post that recipe. 

Step four: place a spoonful of filling at the end of the strip
Step five: fold over to make a triangle
Step six: continue folding in a triangle shape
Step seven: finish with more melted butter on the last section and seal
Recipe via www.bbc.co.uk/food
Prep Time: 10 min
Cook Time: 60 min
Serves: 18

Ingredients: 

Vegetable oil
1/2 tsp mustard seeds
60g onion, chopped
1 tsp ginger, finely chopped
60g frozen peas
1 tbsp ground coriander
1 tsp cumin
1/4 tsp chili powder
3/4 tsp garam masala 
Juice of 1/2 a lemon
Salt
600g potatoes
4 tbsp fresh coriander leaves
2 packets of ready made filo pastry 
5 tbsp butter, melted. 

Method: 

Peel and chop the potatoes into large wedges. Add to a pot of water and boil until the potatoes are soft. Drain and set aside.

In a large pan, add the vegetable oil and the mustard seeds and leave over medium heat until the seeds start to pop. When ready, add the onion and ginger and saute until they have softened and the ginger is fragrant. Add the ground coriander, cumin, chili powder, garam masala and the juice of half a lemon. Leave to saute for a minute or so before adding the frozen peas and the potatoes. Mix well and saute for a further few minutes to ensure the spices are well mixed and coating all the ingredients. Sprinkle in the fresh coriander leaves and set aside to cool.

On a large chopping board, lay out one sheet of filo dough (be sure to cover the remaining sheets with a lightly damp towel so they don't dry out). Brush with melted butter and fold into thirds. In the corner of the resulting three layer strip, place a spoonful of the filling and fold over to make a triangle shape. Add a bit more butter to the strip and continue folding, maintaining the triangle shape and ensuring the filling is securely wrapped. On the final fold, add more butter and press lightly to make certain the edges are secure. Place samosa on a baking paper lined tray and continue with the remaining pastry and filling.

When ready, pre-heat the oven to 200C/400F. Brush the tops of the samosas with a bit more butter and bake for 30 minutes, flipping half way through. Serve with your favorite pickle or chutney and enjoy! Next time I make them, I'll include the coriander sauce that's a traditional accompaniment and I'll be sure to post that recipe.